Appliance Repair Help
Quality Factory Appliance Parts
Quality Appliance Service
| | | | | | |
:: Washer Parts
:: Dryer Parts
| Monthly Special |

:: GE Refrigerator Water Filter 2 Pack
:: MWF2 2 Pack
$69.95
Save 13%

| | | | | | |
__________
__________
----------------
__________
----------------
| Quality Parts & Service |
:: Factory Authorized Parts
:: Same Day Shipping
:: Most Parts In Stock

:: Call Toll Free Today!

:: 1-866-745-2554
:: Same Day Service
:: 90 Day Labor Guarantee
:: Free Online Repair Help
:: Over 15 years Experience
:: Professional & Courteous
| Testimonials |
Thank you for the way you handled my
microwave repair. I can see you are in
business to build relationships and can
look past the short term. I will not hesitate
to refer you to my friends and family.
Trudy M.
microwave repair. I can see you are in
business to build relationships and can
look past the short term. I will not hesitate
to refer you to my friends and family.
Trudy M.
Thank you again for your helpfulness. We
certainly recommend the quality and
helpfulness of your work and the integrity
of the way you do it, every chance we get.
certainly recommend the quality and
helpfulness of your work and the integrity
of the way you do it, every chance we get.
More
| Monthly Tip |
Cleaning out the lint build up inside your
dryer is very important. The accumulation
of lint can catch fire and spread to your
home. The lint will also act as insulation
on your motor and cause premature
failure. All dryers and there vents should
be cleaned at least once a year. Doing
this will keep your family safe and your
dryer operating.
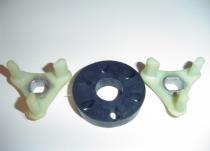
Motor couplings are only installed in design 2000 Whirlpool manufactured
washers beginning in the late 1980's to present. The motor coupling is a
very common repair with the Whirlpool manufactured washer. These
machines have no belt and instead have a motor coupling. The coupling
is installed between the motor and gearbox coupling them together thus
the name motor "coupling". If your washer doesn't agitate or spin then its
very likely that its a bad coupling. If it spins but wont agitate or agitates
and wont spin (still with me?) then I would look for a different problem.
Let's get started.
1. First thing you always do before working on an appliance is unplug it
from the electric outlet. I also recommend shutting off the hot and cold
water supply but its not mandatory.
2. Locate the console and remove the two phillips head screws. Most
models have them in the front, bottom of the console. In some of the
newer models they are located in the back, bottom of the console. Some
washers require you to remove two endcaps on the console to access the
screws.
3. After you remove the two screws, slide the console slightly forward and
then up. The console will then hinge to the back of the washer.
4. Use a flat head screwdriver to remove the two clips holding the back of
the washer to the outer shell of the washer.
5. Disconnect the lid switch harness.
6. You can now pull the outer shell away from the washer. Do this by
grasping the outer shell (I open the lid and grab it there.) and tilt the shell
forward (toward you) and out. The shell is now removed and you can see
the tub. Be careful not to bend the outside walls of the shell when
removing and setting aside. This will help greatly when reinstalling the
shell.
7. With the shell removed we are now ready to remove the motor. Start
by removing the wire harness from the motor. Use care with the plastic
clip holding the harness to the motor. If there is a capacitor present,
carefully remove the 2 wires without touching the capacitor terminals.
Use an insulated screwdriver to remove the charge from the capacitor(Do
this by touching both capacitor terminals with the screwdriver). It may arc
and snap if theres a charge left. This is normal. Please take care around
the capacitor because they can cause serious injury or death.
8. Now we have all the electrical disconnected. Next we will remove the 2
screws holding the motor retainer clips to the motor. Once you remove
those then you insert a flat head screwdriver under the clip and pop it off
the motor. I suggest removing the bottom first.
9. Once the clips are removed the motor can now be removed. You can
now see the broken coupling. Usually one or more of the 3 teeth are
missing. Use a flat head screwdriver to remove the plastic coupling from
the motor and transmission. Take care when removing it from the motor
so you don't damage the motor bearings.
10. To install the new coupling. Use a 1/2" nut driver or deep socket and
a hammer . When the shaft is flush with the coupling then that's on far
enough. Place the rubber part of the coupling on the plastic part on
transmission. Align the motor up and reinstall. This part can be a little
tricky and take several attempts. DON'T FORCE IT!
11. Reassemble washer. Turn water back on and plug in. Check for spin
and agitate.
:: Crosley Washer- Motor Coupling ::
Please remember that working on appliances can be dangerous. Appliances have many
mechanical and electrical parts that can cause serious injury and death. If you aren't familiar
with these types of applications then please call a qualified appliance technician. Lane
Appliance LLC and this site accept no responsibility for injuries to person or damage to
appliances.
mechanical and electrical parts that can cause serious injury and death. If you aren't familiar
with these types of applications then please call a qualified appliance technician. Lane
Appliance LLC and this site accept no responsibility for injuries to person or damage to
appliances.
**Manufactured By Whirlpool Corp. Models Only**
| Did this site save you an expensive service call? Please show thanks and...... |
La Porte
Michigan City
Michigan City
South Bend
Toll Free
Toll Free
219.369.9947
219.879.7858
574.289.5263
866.745.2554
Lane Appliance